Monday 26 November 2012

Knitting Necklaces

Next week I shall be running a workshop to help people knit necklaces to this pattern, which I adapted from one I found in a library book, it's quite different from the original, so I feel it was my inspiration, but so heavily modified I don't feel bad in claiming it as mine.  There has been much interest from knitters in this idea, so I thought I would share the pattern for anyone who wishes to use it!
It is worked from this chart, threading the beads onto the yarn before starting to knit, putting the beads on the yarn in reverse order to which they will be knitted.
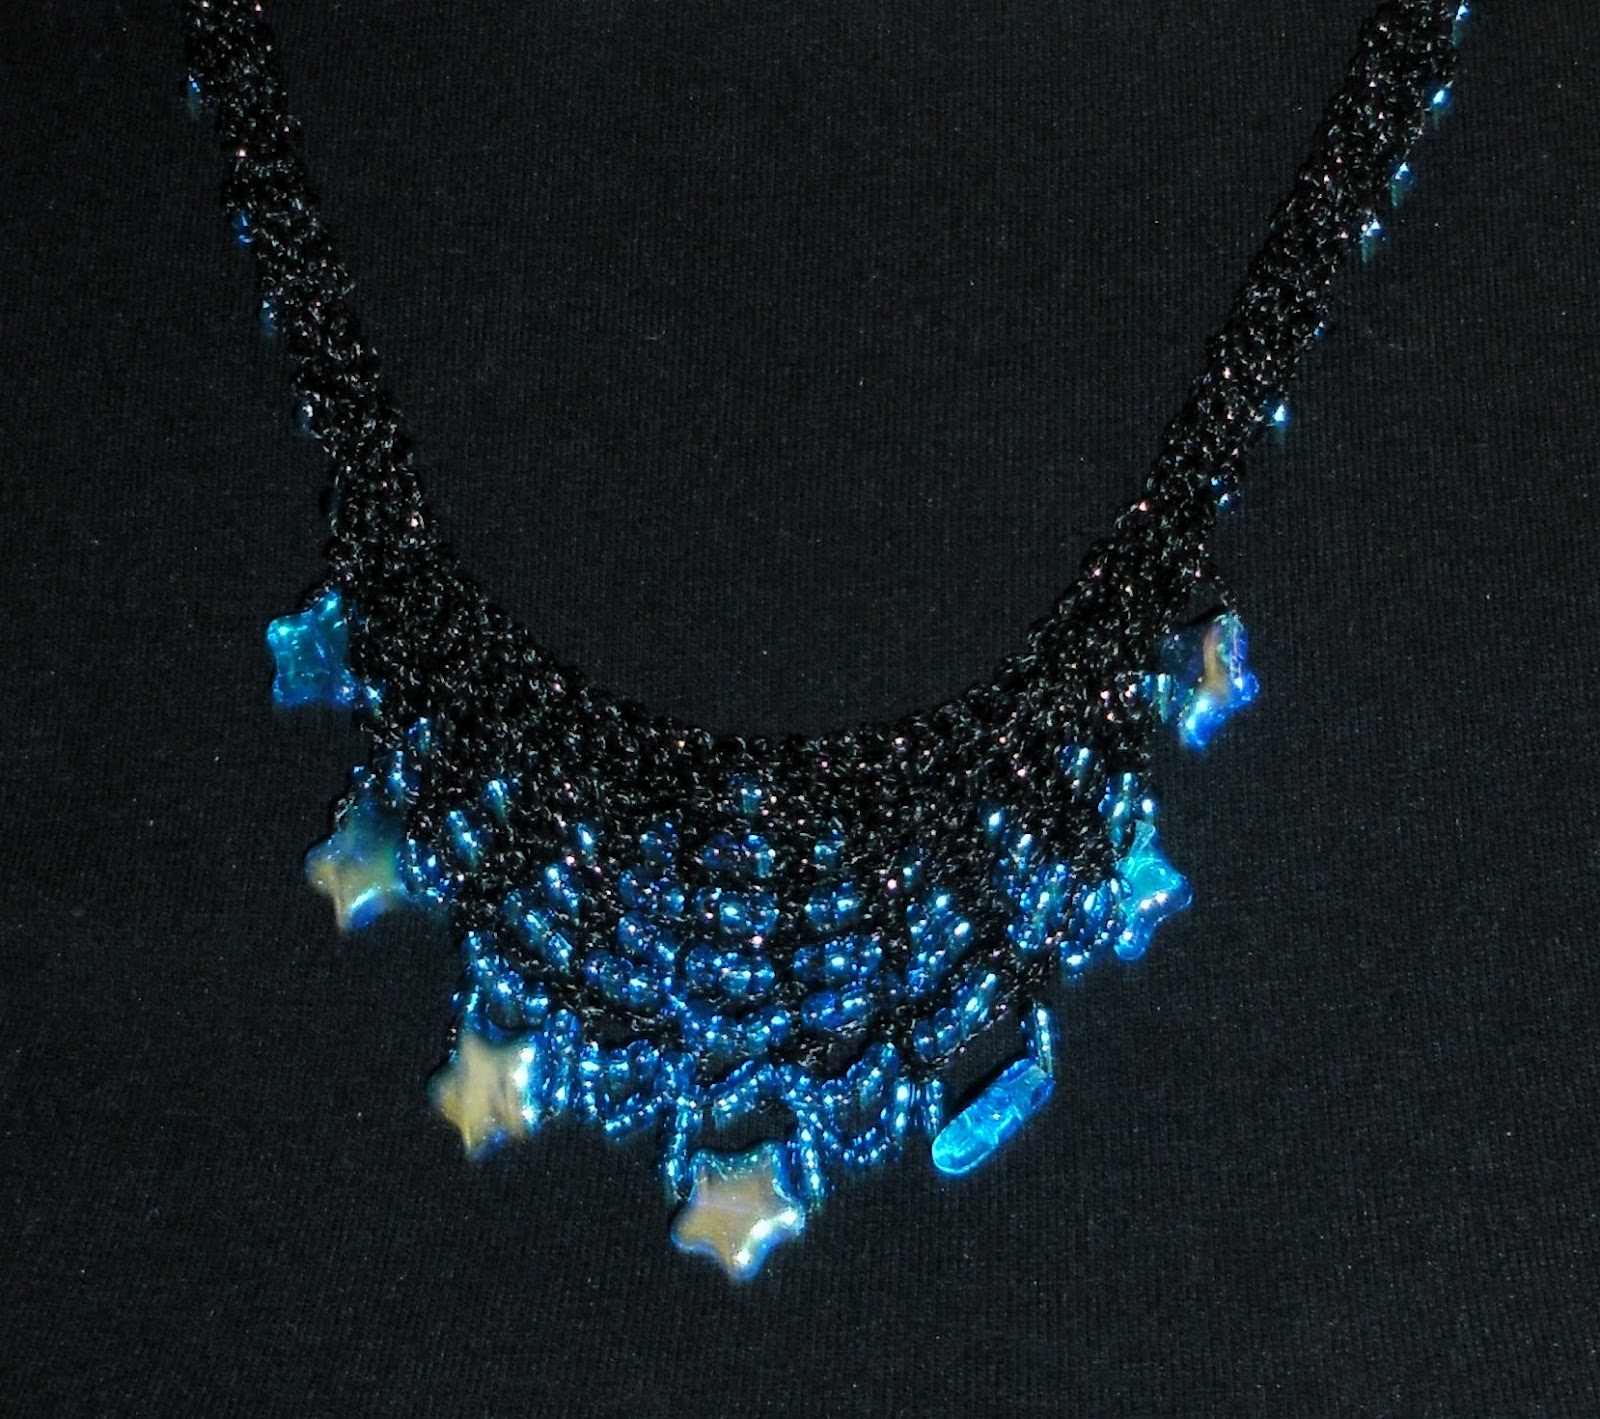
The above picture shows quite clearly how the beads are distributed, including the 20-30 beads each side of the central motif and showing how the feature beads can be included to make the lower edge more interesting.

You will need:-
1 pair 2/2.5mm needles
Ball of Goldfingering or skein of Perle embroidery thread
Quantity of small round beads (with large enough hole to thread on chosen yarn)
Optional - 7 feature beads for lower edge

Start by threading the beads on to your yarn , in reverse order to which you will knit them. ie the first bead to go on is the last one to be put on the yarn. Follow the chart, remembering to thread on 20-25 beads each side of the row of beads that form the lower edge of the necklace. 
The easiest way to thread the beads on is thus:- Thread a fine sewing needle with a short doubled length of ordinary sewing thread, thread the start of the knitting yarn through the loop of the doubled thread so that it hangs down and you have a loop of knitting yarn through the loop of the sewing thread. You can now start threading the beads onto the needle, and thence onto the yarn.

Cast on by the backward loop method, this enables the beads to hang loosely between the stitches and drape properly.

Cast on 3 stitches, slide 1st bead up to needle, cast on 2 sts, slide up next bead, continue thus till you have 20 - 25 beads cast on, then cast on 2 sts between each of the groups of beads at the centre of the necklace (one,two,three, four, five, six, seven, six, five, four, three, two, one. If desired, one feature bead at the centre of each odd numbered group) Then cast on 2 sts between each as before till you have another 20 -25 beads on the second side of the centre, then cast on a further 3 sts, turn.

2nd row, knit till 3 sts beyond the last bead of the central group, wrap & turn (move yarn to front of work as if to purl, slip next stitch on to right needle, pass yarn back to other side of work, replace slipped stitch back onto left needle and turn to start working back in other direction. written as 'W&T')
3rd row, knit 5 sts, knit to end of 2nd row of chart, inserting beads as chart - you will find yourself setting in beads exactly above the previous ones. one bead less per group. When all beads have been knitted in, knit 3, W&T.

4th row, knit till 3 sts past the last bead in previous row, W&T.

5th row, W&Ting at the end of the row, continue as before from the chart till all rows of the chart are worked and you've run out of beads (assuming you counted right!)
When all beads are knitted continue to end of row, turn and knit one row, then cast off loosely.

Sew hook & eye fastenings to each end, then wash gently in hand hot water, use a little fabric conditioner in the final rinse and pat dry in a towel. Hang to dry by fastening, this helps the necklace to hang properly in wear. 
 Hopefully, the photographs will give you an idea of how adaptable this pattern can be, it depends on your choice of yarn and beads! The last example is knitted with multicoloured perle embroidery thread, which gives quite a lot of pzazz! If you have any problems, don't hesitate to email me for help at mwmyn@yahoo.co.uk, and feel free to pass the pattern around!


Thursday 15 November 2012

Bears & Beasties

 
Just over a year ago I returned to making artist bears, Which I had done from 1997 - 2005, when arthritis & RSI put a stop to it. After my accident in 2007, I thought such things were forever out of reach, so attempting my first sewn bear in 6 years was quite a big deal!  I don't expect to ever be able to make anything as grand as my lovely alpaca pandas, of which I am extremely proud, but one has to start somewhere!
Sunflower was one of the first of my new career in bear making, 2.5 inches tall, I was thrilled to be able to create him! Over the past year I have gradually pushed my boundaries, and had to admit that doing my favoured, traditional button joints is too much strain on tired & damaged hands, so I now  mostly use split pin joints, like those in the early manufactured bears, and used by most bear artists.  I am disappointed, but being able to make jointed bears of any sort is a truly satisfying thing for me, so - onward & upward!
Returning to using luscious mohair & alpaca fabrics has also been a joy, Feargus may be smaller than my big alpaca pandas, but I think he is truly in the same spirit, and we all know the best things come in small packages! I'm glad to say that he has been adopted by people who clearly appreciate my work, as they have also adopted others of my bears and encouraged others to do the same! (Thank you, Lisa!)
When I was running the original 'Orkid Bears' I also made other creatures and cloth dolls, which I would like to try later on, but I have, at least, started down that road by making the first elephants since 2004!
First, in lilac, sparse mohair (with button joints!)
Secondly, in 'cashmere'velvet. Generally, I'm fairly happy with the pattern, but the ears need adjusting in their cut - they're a bit too much like flags!  Next time I will enlarge the pattern and make a bigger version - Cielo & Flora are only about 5 inches tall.
The next creatures I have to put my revived designing skills to is dragons! This is the most complex dragon I made in my earlier incarnation as a bear artist - not sure i can manage something that complex just yet, but, with my Welsh heritage, I really have to make a dragon of some sort! So, watch this space :o)


Wednesday 7 November 2012

Ongoing evolution.

Finally got my own website up! Take a peek at www.mwmyn.com, still some things to be tweaked, but now you don't have to trawl through Etsy to find my cuddly friends and adopt one!


In other news, have also managed to make real another idea, that's been in the back of my mind for ages - Jeffery's charming drawings of my bears on tee shirts for little people!  Tee shirts in tiny sizes are difficult to get hold of at reasonable prices, so I'm printing body suits (like a vest, but with poppers to hold it down between the legs) with long or short sleeves - more practical, anyway.  I'm focusing on babies at the moment, but will do adult sizes on request.

I have sent out my second monthly newsletter today - let me know if you'd like one in your inbox, too. As the cold weather creeps up on us, my output is likely to slow down, arthritis doesn't much like cold and damp :(

 I'm focusing entirely on the bears now, knitting is for my own satisfaction only, now!  However, in response to a wave of requests, I'm running a workshop on making my knitted necklaces next month, still have a couple of places if you want to join us. On the 4th December, at Sue's Crafts in Cheltenham 10-4, get in touch if you're interested.
Also considering running a year of monthly workshops on bear making next year, have a couple of people interested, how about you? We'll start with a simple velvet bear, then work on to jointing, etc, going through stuffing techniques, needle sculpting, fabric choices, and anything else people need help with!


Monday 22 October 2012

Plus ca change, plus c'est la meme chose!

In September I stopped selling through By Local, a brilliant 'pop-up' gallery/shop in Cheltenham, in order to re-assess what I'm doing and change direction somewhat!  I started making 'artist' bears in 1997, under the professional name 'Orkid Bears', and managed to do quite well, at a time when bear collecting was popular and money was a lot more available.  In 2005 I stopped, due to health issues and changes in my personal life.
Biscotti, just adopted!
Two years later I destroyed my right elbow, and thought my crafting, and independent, days were over.  I taught myself to write with my left hand, and discovered the amazing online community - you can do a lot of surfing using only one hand!  My orthopaedic Consultant, however, had other ideas and 18 months later, after diligent searching, he told me he had found a replacement joint that would be suitable to bridge the yawning gap between my my upper and lower arms. Just over 2 years after smashing my elbow I had to get used to having 2 working arms again!
One of my knitted bears
I gradually returned to knitting again, then, after selling my knitted bears in By Local, along with other knitted goods, for about 6 months, I decided to see if I could still sew bears. I can!  After a year of re-learning the skills and working out how to do it with limited strength and dexterity, I'm satisfied that I can do it well enough to re-commit to my bears.
My bears tend to be smaller now!
So, I've moved back into craft fairs, I have a Facebook Page for my cuddly friends, and my husband is creating a new website for me, where you'll be able to buy my goodies with the aid of Paypal!  In the meantime, you can find them at http://www.etsy.com/shop/MwmynsMakes  and my Facebook Page is http://www.facebook.com/MwmynsMakesOrkidBears.  Look out for www.Mwmyn.com!


Thursday 29 March 2012

Hatching a baby dragon!

I saw this delightful dragon online courtesy of Marjorie Crochets, and realised I needed to have a dragon in my portfolio! My eldest daughter collects them and we both have a dragon tattoo (though hers is much more impressive than mine!) so it's almost sinful that i haven't made one for some time.
 This was my result, using her pattern, but lots of odds and ends of different wool, so my tension was a bit dodgy, to say the least - my fault, not hers! So I had another go, using all the same yarn, and tweaking it a little bit, to use my favourite button joints.
Having sculpted the face, too, I think it's a great improvement! However, to my mind it can't be a dragon, even a baby one, unless it has wings!  Spikes up its back speak to me of a baby dinosaur, rather than a dragon, and lovable though a baby dragon is, it really shouldn't be a bit fluffy and soft - at least a hint of irridescent scales should be present!
So this is the result! Twitter & Instagram offered me several names, and I've settled on 'Lyla' and she will go on my Etsy shop soon (http://www.etsy.com/shop/MwmynsMakes) I shall twaek the design a bit more, I think the tail needs to be a bit longer and thinner, and more ideas are bound to suface in the middle of the night - design is always a work in progress!

Monday 19 March 2012

Knitting Necklaces

I have been knitting necklaces for nearly 2 years, having started because a friend has sensitive skin, and metal made her skin sore.
I have been selling them at By Local, in Cheltenham for nearly a year, and, having recently opened an Etsy shop http://www.etsy.com/shop/MwmynsMakes I decided it was time to offer them to a wider world!
 Each one is made by threading the beads on to embroidery silk, fine cotton or Goldfingering yarn, in the reverse order to which they will be incorporated (i.e the first bead to be threaded on is the last one to be knitted in) which requires me to really have my brain in gear! Then I cast on, slipping the beads into place as I go, till the lower edge is created.  I then use a short row technique to shape the centre of the necklace, including the beads in order as I go, so that the necklace will hang in a nice curve.
 This is the necklace I have just put on Etsy, and I call it 'Spring Garden', because it made me think of the crocuses that are coming up, and the way their colours sparkle in the dew & raindrops on the grass around them!
This is what it looks like when I'm about half way through the actual knitting! I use bamboo or wooden needles for this job, less likely to lose everything when I put it down than I would be using slippy metal needles.
 When i've finished knitting it looks like this.  I still have to put on a way of fastening ( I use normal, garment hooks & eyes, as proper jewellery findings are much too heavy - believe me, I've tried, disastrous!)  I then wash them and pull them into shape, hanging them to dry in the shaped curve they need to lie in on the neck.
Finished article! They mostly work out between 16 - 18 inches long, can't always predict exactly, as they stretch differently when washed, so they sit neatly at the base of most necks. I can, of course, do longer ones to commission, but this seems to be a popular length.  There's another one on its way, keep an eye on my Etsy shop!

Wednesday 7 March 2012

Branching out - and back into the past!

In 1997 I started a small business, making one of a kind, hand stitched collectors bears. By 2005, although I was doing quite well, a combination of arthritis and RSI meant I could no longer make the bears, and I closed the business.
In 2007 I fell, and completely destroyed my right elbow, leaving me unable to even feed myself for 2 years, and in a frightening level of pain. However, in 2009 my lovely consultant surgeon found a new joint, which could be used in my situation, and he fitted it for me in May of that year - one heck of a birthday present!  Having a very low boredom threshold, I returned to small scale knitting as quickly as I could, and my physio encouraged me to keep it up. By late 2010 I was knitting little bears to my own patterns.
By spring of last year I was selling my knitted bears, at The Brewery Arts Centre, in Cirencester (thanks, Tracey!) and at By Local, in the Regent Arcade, in Cheltenham.  Before long, I just had to see if I could still sew bears, and I was off again!
Many of my Twitter friends encouraged me to make them available online, so I looked at Etsy, and finally my bears are back online, here http://www.etsy.com/shop/MwmynsMakes so I've gone full circle!  I will add other makes, such as necklaces, and other furry creatures, but I'm excited to see where this takes me!

Wednesday 11 January 2012

Making Tiny Teddies

Been so busy making, I really have struggled to find time to keep this up! One of my more popular itms are my small, button jointed bears, and I have recently completed a kit so that people can make their own. This is the bear above, made in a non-fray velour, with bead eyes, but a fixed head.
This shows a slightly smaller bear in the process of being born (don't worry, they feel nothing till they get their first cuddle!)  This bear has a jointed head, as well as limbs, and has contrasting paw pads, unlike the kit bear, which I have kept as simple as possible.
This is the completed bear, called 'Sunshine' who now has a new home! I also do knitted bears, and i'll try to do a blog about those, soon! If you want to have a go at making one from the kit, You can contact me for one, or I shall be doing a workshop to make one on March 3rd, at Gloucester Arts & Crafts www.GlosArtsCrafts.co.uk) or email me mwmyn@yahoo.co.uk